Gluten-free, dairy-free mini panettoni: recipe translation
Since reading recipes that start with ten screens of story are incredibly frustrating, I’ll cut to the chase and put the commentary at the bottom.
I’ll describe exactly what I did; footnotes indicate what I would change, or other comments.
Ingredients
For the biga:
- 30g Dove’s Farm Freee white bread flour
- 20g brown rice flour1
- 1/2 tsp instant yeast2
For the main dough:
- 90g Dove’s Farm Freee white bread flour
- 40g Dove’s Farm Freee white plain flour
- One medium egg
- 3/4 tsp instant yeast
- 50g Pure buttery taste3
- 40g Plenish almond
milkdairy alternative456 - 60g caster sugar
- Zest of one lemon
- Zest of one orange
- 1/4 tsp ground vanilla
- 40g raisins
Method
Prepare the biga the night before you want to bake:
- Mix the flour and instant yeast in a bowl.
- Add 50ml of lukewarm water7
- Mix together with a spoon.
- Cover with cling film.
- Leave in a non-draughty space at room temperature
- Weigh out the 50g of Pure and cover in a separate bowl, again leaving out at room temperature.8
- Wait for 12 hours.9
The next day, make the mini-panettoni:
- Soak the raisins in warm water.
- Put the biga, flours, yeast, sugar, lemon and orange zest, and vanilla into a large bowl and mix.
- Start kneading the mix with dough hooks on a handheld mixer.10
Gradually add the almond
milkdairy alternative, and mix thoroughly (around 5 minutes). - Add the egg and mix again.
- Add the Pure one teaspoon at a time, mixing until it is fully incorporated each time.11 Once finished, the dough will be very wet, barely firmer than whipped cream with soft peaks.
- Drain and squeeze the raisins. Add them to the dough, and carefully mix them in with a spatula.
- Cover the bowl with cling film, and leave to stand at room temperature for an hour. The dough will not rise significantly in this time; this is OK.
- The dough is too wet to fold by hand, so we use a spatula. Pull one edge of the dough into a flap over the middle. If the dough sticks to the spatula too much, dust it very lightly with a little extra bread flour. Rotate the bowl and repeat, until you have gone all the way around the edge a few times.12
- Take a muffin pan and place 8 silicone cupcake cases into it. Divide the dough evenly between the cases; they should fill about halfway.13
- Place in the oven and turn it on to the minimum temperature, around 40°C. Wait for two hours for the panettoni to prove.14
- Turn the oven up to 160°C, and cook for 30 minutes.
- The panettoni can be removed from the pan immediately, Edit: You almost certainly want to eat them the same day. and will likely fall straight out of their silicone cases. You probably want to let them cool at least a little before eating.
Context
My partner is intolerant to both gluten and dairy, which makes finding festive desserts hard. Lately, with Christmas upon us, they’ve been particularly missing panettone. Searching online, we’d found evidence that suitable panettoni may exist in Italy, but at least online the products were always “currently unavailable”. I did find a number of potentially suitable recipes to make our own, however.
I picked one that looked promising to try. The first hurdle was that it was in Italian; this was overcome with a mix of applying the limited Italian I’ve learned from Duolingo, and using Apple Translate. The second issue was that some ingredients are not easily available in the UK. (For example, it recommends “Schär mix B” bread flour, as unlike other gluten-free flours, it is “commonly available in the supermarket”. This is not true in the UK!) Some substitutions needed to be made as a result; in some cases, there is room for improvement, as discussed in the footnotes.
For some reason, most supermarkets seem to have stopped selling dried active yeast (when only a few years ago it was hard to buy instant yeast). Fortunately, the substitution is simple, and actually makes the process easier.
Results
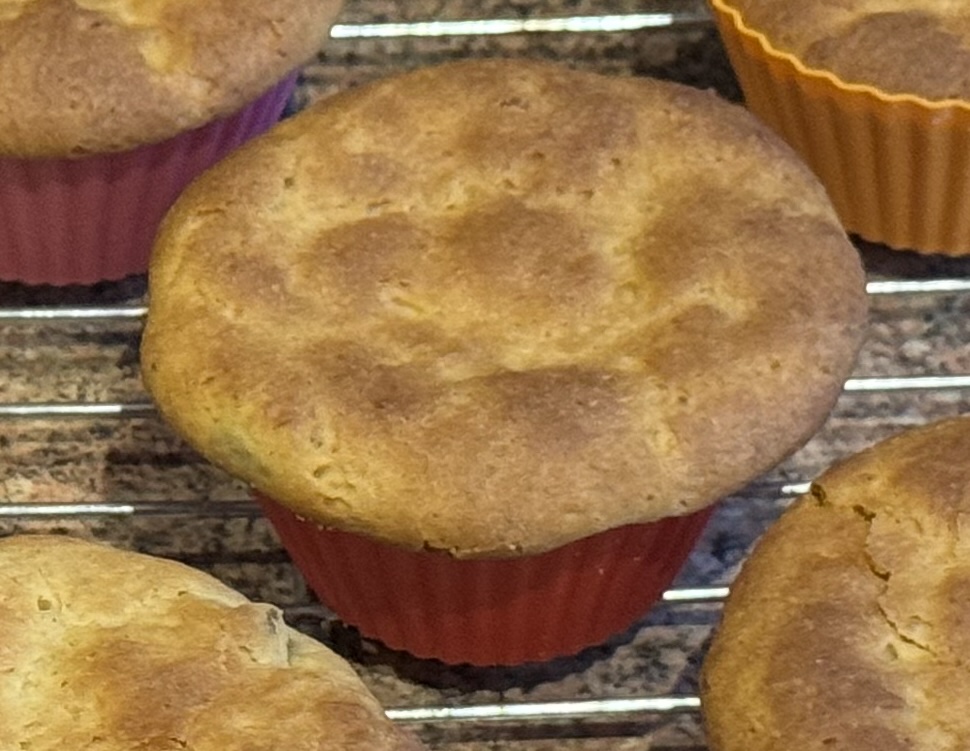
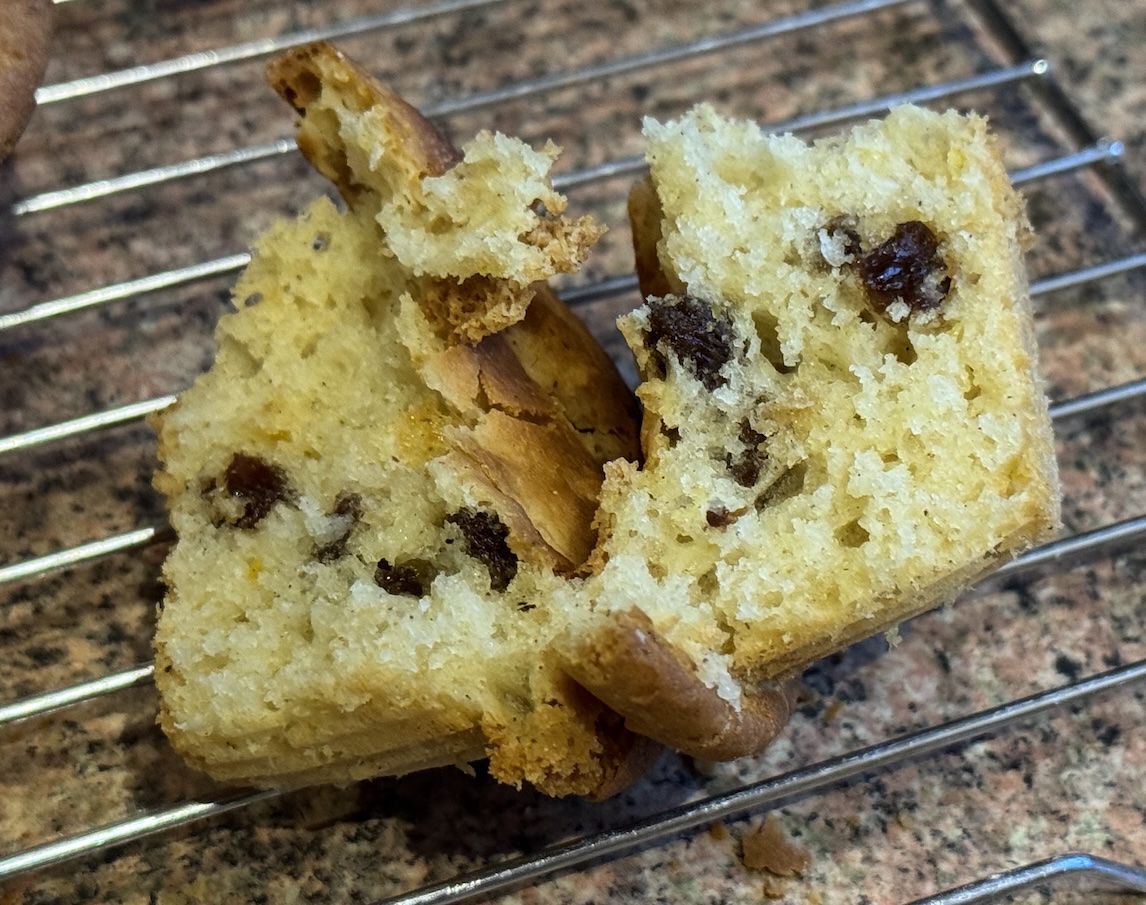
The dough rose well, and the resulting panettoni have good structure. My partner was impressed that such a structure was possible with gluten-free baking.
The mixture overtopped the cases a little, and the texture became quite crunchy there; potentially a ninth mini-panettone could have been made to avoid this. Otherwise, the texture suffered a little from the brown rice flour. (I am very sensitive to the texture and flavour of rice flour in general, though, and my partner said it didn’t taste of rice flour at all to them.)
My partner reported a very buttery flavour (positive affect)15, despite there being no dairy. Most people (including my partner) who tried one said it was quite lemony. The original recipe called for two teaspoons of zest; I didn’t know how to measure zest, so just used entire fruit. This was probably a little generous compared to the original, but the thing my partner likes most about panettone is the citrus aroma, so was probably the right call for this recipe.
Edit: Having now tried some the next day, it is safe to say that the panettoni do not keep well. Less than 24 hours later, trying them cold, they were already very stale, and the flavour was not great. Warmed back up in the microwave, they were better, but not as good as on the first day. The original recipe’s claim that they would keep for 3–4 days in a plastic bag seems very dubious, although perhaps the humidity of a plastic bag would preserve them better than the sealed cake tin that we used.
All in all, the steps were all relatively easy to follow, although they were numerous and some steps were a little laborious. The resulting panettoni were good, even if there are a small number of small improvements that could be attempted next time.
I’ll update here if and when I attempt improvements to the recipe.
Notes
-
The recipe called for white rice flour, but we were out. In hindsight, I’d not recommend this substitution; instead, use plain white gluten free flour, or buckwheat flour. ↩
-
3/8 tsp would probably be enough, as the original recipe called for 2g of dry active yeast. ↩
-
No idea why Pure discontinued the pure olive oil-based version. ↩
-
Don’t confuse with the “barista” version. ↩
-
Yes, I weighted it. ↩
-
The recipe notes at the end that if you don’t use its recommended flour, then you need to recalibrate the liquid. I didn’t spot this until too late; I would probably use a little less fluid next time, as the dough ended up wetter than the illustrations on the original recipe. ↩
-
I should have weighed this (50g). None of my measuring jugs is precise enough to get 50ml without a large uncertainty, and the biga ended up very wet as a result. ↩
-
This is to make it easier to work; it was still a bit unwilling to mix. I might try warming this in the microwave next time. ↩
-
Eight would probably have been enough, but I slept in. ↩
-
This would probably have been a lot less demanding on my arm muscles if I’d used a stand mixer, but I don’t have one. ↩
-
Seriously, this took ages. You probably want to soften it first. ↩
-
The original claims eight times; that seemed like a lot. My partner was dubious this was doing anything; the dough seemed too wet to retain any structure added at this point. ↩
-
It would also have been a good idea to lightly grease the top of the pan, since where the dough rose too high, it ended up sticking there. ↩
-
We used the top of the oven, which gave a crispy top to the panettoni. We might try the middle shelf next time, to see if it gives a softer top. ↩
-
My partner is extremely sensitive to the taste of dairy butter, such that eating a single bite of something baked with it will leave them needing to find something strong-tasting to take the taste away. This wasn’t such an instance; the flavour was good. ↩